08-VueRouter路由集成
TIP
vue2使用的router3版本,在vue3则是router4版本
一、安装
shell
npm install vue-router@4二、使用
router
在src下创建文件夹router
在router下创建index.js
还没创建文件,会触发报错,这里全部注释,按需创建自己的路由文件地址
js
import { createRouter, createWebHashHistory } from 'vue-router';

// 本地静态路由
export const constantRoutes = [
  //   {
  //     path: '/login',
  //     component: () => import('@/views/login/index.vue'),
  //     meta: {
  //       isParentView: true,
  //     },
  //   },
  //   {
  //     path: '/test',
  //     component: () => import('@/views/test/index.vue'),
  //   },
  //   {
  //     // path: '/404',
  //     path: '/:pathMatch(.*)*', // 防止浏览器刷新时路由未找到警告提示: vue-router.mjs:35 [Vue Router warn]: No match found for location with path "/xxx"
  //     component: () => import('@/views/error-page/404.vue'),
  //   },
];

// 创建路由
const router = createRouter({
  history: createWebHashHistory(),
  routes: constantRoutes,
});

export default router;顺便在src下创建views文件夹,方便写vue页面
main.js
js
import { createApp } from 'vue';
import './style.css';
import App from './App.vue';

// 自定义样式
import '@/styles/index.scss';

// 路由
import router from '@/router';

const app = createApp(App);
app.use(router);
app.mount('#app');
// 一定要先use,在mount,否则报错找不到router !!!把main.js改写一下
js
createApp(App).mount('#app');
const app=createApp(App);
app.use(router);
app.mount('#app'); INFO
路由对应的页面是 router-view
你的这个标签在App.vue里面,用App.vue作为根页面,然后看情况而定。
- 如果是后台管理系统,那么侧边栏和顶部栏是一定会有的,那么就要考虑容器布局,用创建layout文件夹。
- 如果不是后台管理系统,是手机端,没有公共页面,可以不需要layout做集成页面。
三、测试
App.vue
html
<template>
  <h1>Hello App!</h1>
  <p>
    <router-link to="/test">Go to Test</router-link>
  </p>
  <!-- 路由出口 -->
  <!-- 路由匹配到的组件将渲染在这里 -->
  <router-view></router-view>
</template>
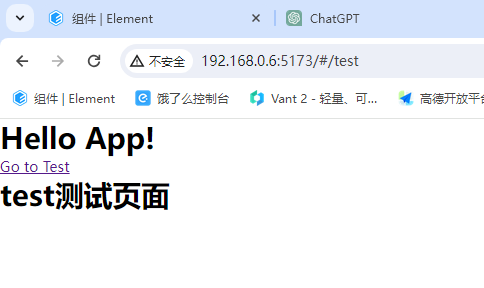
<script setup></script>router/index.js
js
  {
    path: '/test',
    component: () => import('@/views/test/index.vue'),
},在views下创建test/index.vue
html
<template>
  <h1>test测试页面</h1>
</template>

<script setup></script>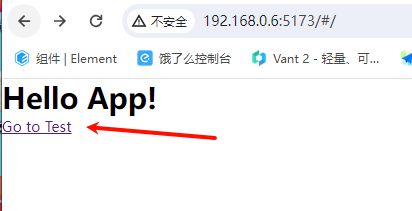
点击,路由变了,页面元素也有了,说明跳转成功了。
TIP
router-view就是指向的当前路由文件
- js获取当前路由信息
proxy.$route - js跳转
proxy.$router.push({ path: '/' });