09-mixin混入
一、新建
src下新建utils
创建mixin.js
WARNING
因为还没有引入ui库,所以notify和$message肯定没有方法,暂时用log打印日志查看调用方法
js
// 抽取公用的实例 - 操作成功与失败消息提醒内容等
export default {
data() {
return {
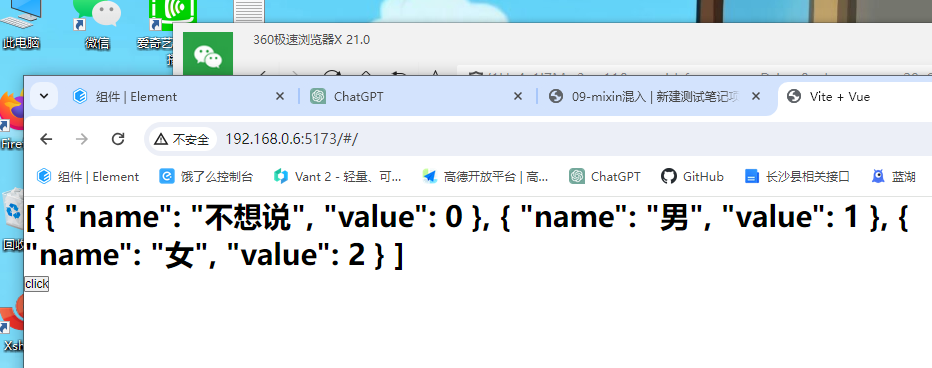
sexList: [
{ name: '不想说', value: 0 },
{ name: '男', value: 1 },
{ name: '女', value: 2 },
],
};
},
methods: {
// 操作成功消息提醒内容
submitOk(msg, cb) {
console.log(msg||'操作成功消息提醒内容');
// this.$notify({
// title: '成功',
// message: msg || '操作成功!',
// type: 'success',
// duration: 2000,
// onClose: function () {
// cb && cb();
// },
// });
},
// 操作失败消息提醒内容
submitFail(msg) {
console.log(msg||'操作失败消息提醒内容');
// this.$message({
// message: msg || '网络异常,请稍后重试!',
// type: 'error',
// });
},
},
};二、混入
局部引入和全局引入的使用方法都一样
引入不一样
- 局部用import引入,mixins声明
- 全局在main.js引入,app.use
1、局部混入
在单页面中引入
html
<script>
import mixin from '@/utils/mixin.js';
export default {
    mixins: [mixin],
};
</script>html
<script setup>
const { proxy } = getCurrentInstance();

async function submit() {
    proxy.submitOk('保存成功');
}
</script>页面可以多个script
html
<template>
  <h1>{{ sexList }}</h1>
  <button @click="handleClick">click</button>
</template>

<script>
import mixin from '@/utils/mixin.js';
export default {
  mixins: [mixin],
};
</script>

<script setup>
import { getCurrentInstance } from 'vue';
const { proxy } = getCurrentInstance();
async function handleClick() {
  proxy.submitOk('保存成功');
  proxy.submitFail('操作失败');
}
</script>2、全局混入
main.js
// 混入 -- 抽取公用的实例(操作成功与失败消息提醒内容等)
import mixin from '@/utils/mixin';
app.mixin(mixin);App.vue
html
<template>
  <h1>{{ sexList }}</h1>
  <button @click="handleClick">click</button>
</template>

<script setup>
import { getCurrentInstance } from 'vue';
const { proxy } = getCurrentInstance();

async function handleClick() {
  proxy.submitOk('保存成功');
  proxy.submitFail('操作失败');
}
</script>页面如果显示有内容就说明对了
- 混入的变量可以直接在页面上使用
- 混入的方法需要getCurrentInstance和proxy获取
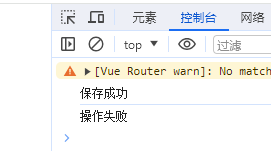
点击方法,控制台打印了
保存成功
操作失败
说明我方法调用成功了
题外话
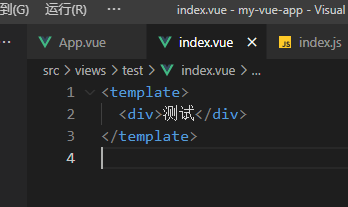
我的vscode代码报红,在上一篇跳转test的时候就出现了
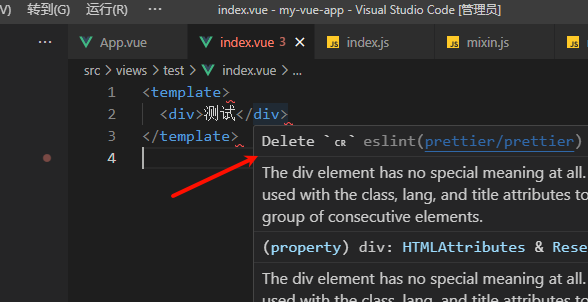
Delete ␍eslint(prettier/prettier) 错误的解决方案
经过查证:
我的步骤没有出问题,把vscode编辑器的底部
CRLF改成LF就好了。

问题根源:
罪魁祸首是git的一个配置属性:core.autocrlf
由于历史原因,windows下和linux下的文本文件的换行符不一致。
Windows在换行的时候,同时使用了回车符CR(carriage-return character)和换行符LF(linefeed character)而
Mac和Linux系统,仅仅使用了换行符LF老版本的Mac系统使用的是回车符CR因此,文本文件在不同系统下创建和使用时就会出现不兼容的问题。
TIP
改成LF就好了
写在最后
不推荐搞混入,谁用谁知道,尤其是团队开发,混入进来别人会看不懂代码,埋雷。被吐槽的人巨多,掌握用法即可